Electric Guitar 'String Ground'
What Is A "String Ground Wire"
In electronics, “ground” is the term used to refer to the common return path of an electric circuit. Ground connections are an essential aspect of your instrument’s wiring. They are required for the proper functionality and safety of your guitar and amplifier.
The design of most electric guitar pickups are by definition “electromagnets”. As electromagnets, they are prone to something called electromagnetic interference or EMI. Potential sources of EMI are all around us: cell phones, radios, computers, and fluorescent lights are just a handful of common sources. To compound the issue, the human body is a natural antenna for electromagnetic interference.
When near the guitar, the human body naturally increases interference in the circuit. We may hear this as hiss and noise through the amplifier. To eliminate the EMI that a player inherently adds to the signal, a wire is attached in such a way as to connect the guitar’s strings to the instrument’s electronic ground.
While the player touches the strings, this wire effectively cancels out the noise that their body adds to the signal by giving it a path to ground. This crucial length of wire is known as the “String Ground Wire”.
Symptoms of A Missing/ Detached String Ground Wire
There is an easy, no tools required, way to quickly test if your guitar’s string ground wire is properly connected.
While keeping one hand on the strings, use the other hand to touch ANY piece of metal on the guitar body. Humbucking pickup covers, bridges, tailpieces, the jack plate, control plate, knobs, etc.may all be good choices. If touching these metal parts produces additional noise, such as clicks or pops, there is a good chance that your instrument’s string ground is not properly attached. See below for more on how to fix this issue.
Tremolo Claw Mounted String Ground
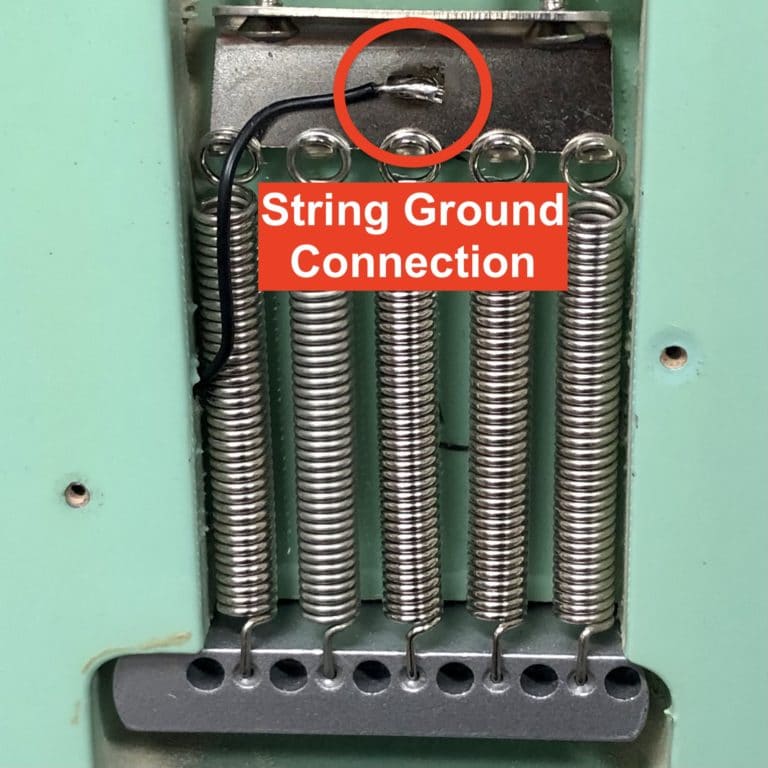
In the photo, a wire is soldered to the “tremolo claw” of a Fender Stratocaster. The attached springs connect to the tremolo block at the bottom of the photo, which in-turn holds the ball-end of the guitar strings.
Since all of these metal pieces are electrically conductive, the ground wire is effectively connected to the strings and therefore the player as they touch them during use.
When the player removes their hands from the strings, their body is no longer connected to the electronics ground, therefore additional noise may return. This is perfectly normal and in keeping with the circuits design.
Tune-o-matic Bridge or Stop Tailpiece String Ground
Guitars that utilize a Tune-o-matic bridge and Stop Tailpiece design, such as the Gibson Les Paul, typically have their string ground wire wedged into the mounting hole for one of the bridge or tailpiece mounting studs.
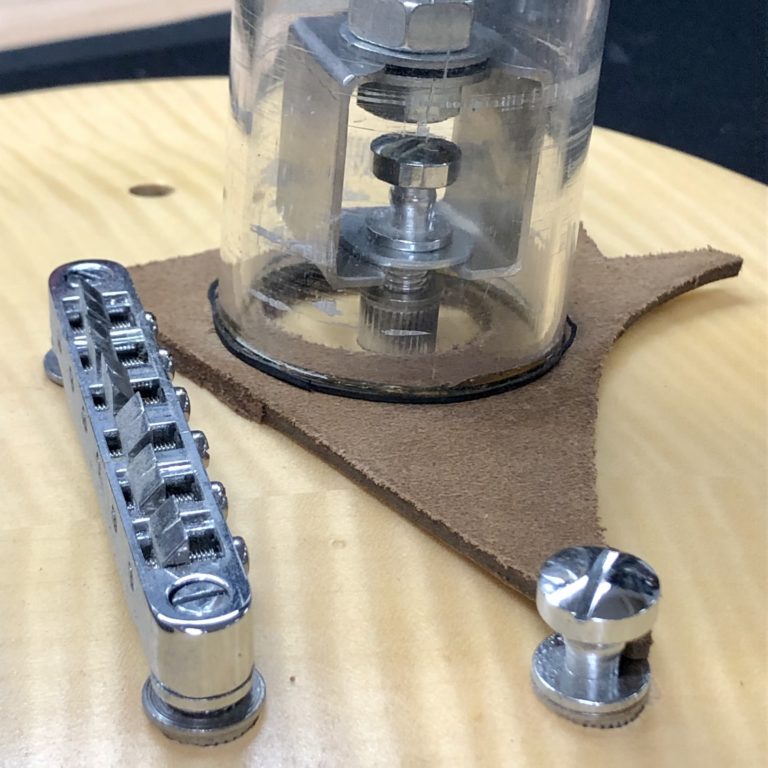
The chain of connectivity is similar to what was discussed above: The string touches the tailpiece, which is mounted to the stud, which is screwed into the bushing. If we attach a wire to the bushing and connect the other end to ground, the strings will effectively be grounded!
This particular guitar was assembled from a kit and the owner forgot to install the ground wire before installing the bridge and tailpiece. To retrofit one, we must first use a bushing puller tool to remove the tailpiece anchor bushing that is press fit into the guitar’s body.
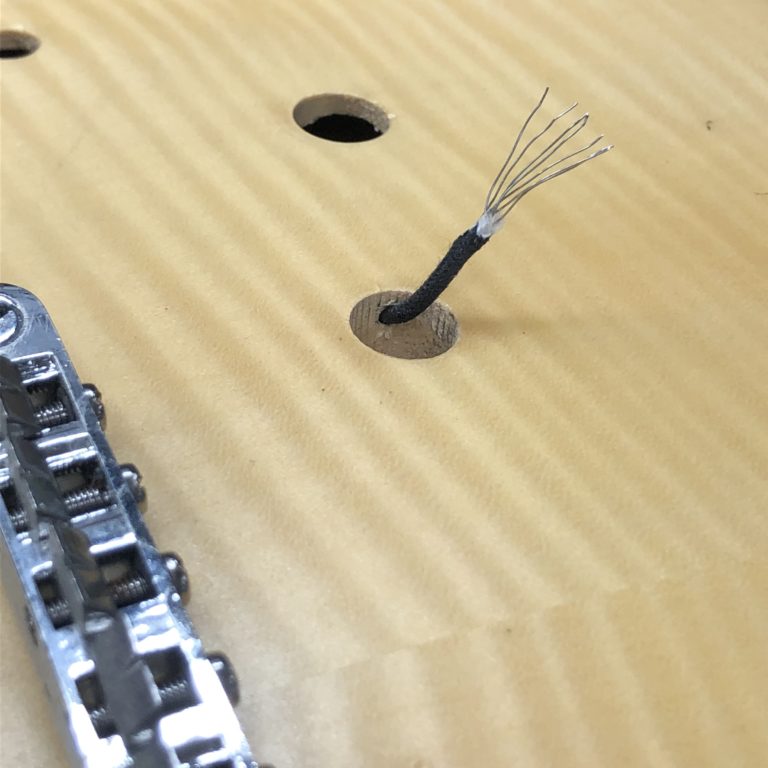
Once the stud is removed, we simply cut and strip a piece of wire then feed it into the preexisting hole leading into the guitar’s electronics cavity.
Afterwards, we reinstall the bushing and solder the other end of the wire to ground on the back of the control pots. With that completed, after a restring the guitar is good to go!
String Ground Install For Archtop Guitar: Step by Step
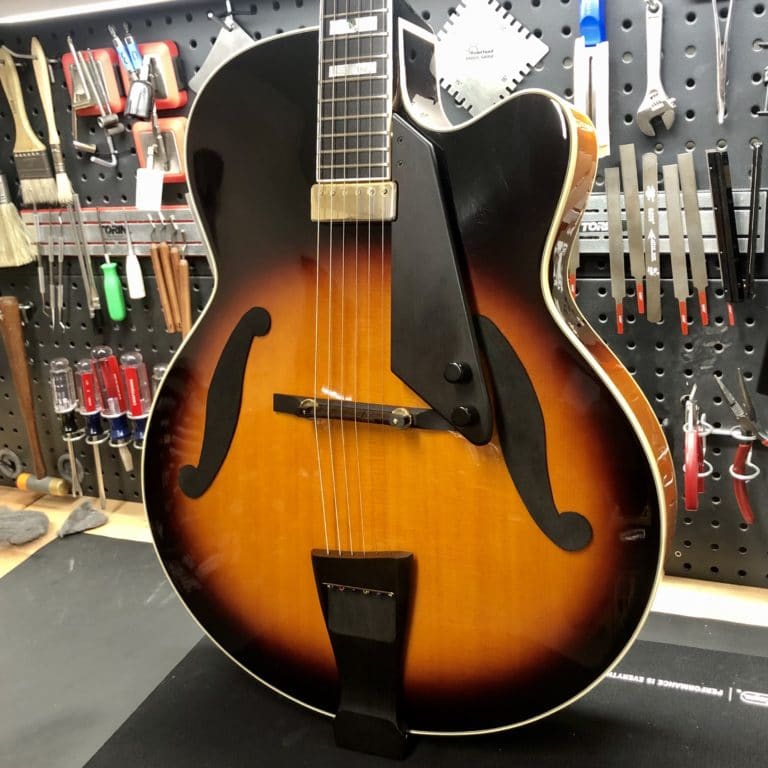
This Peerless Imperial model guitar is fitted with electronics reminiscent of those used during the golden age of archtop guitars from makers such as D’Angelico and D’Aquisto. It features a “floating pickup” mounted at the end of the fingerboard, with volume and tone controls attached to the pickguard, wired to a side mounted output jack.
Since guitars of this ilk were primarily designed to be acoustic instruments, the electronics are set away from the guitars top. This is known as a “floating pickup”. It allows the top to vibrate unobstructed by the added weight and sound dampening properties that could occur with other methods of installation.
One important feature this particular model lacks is a string ground wire.
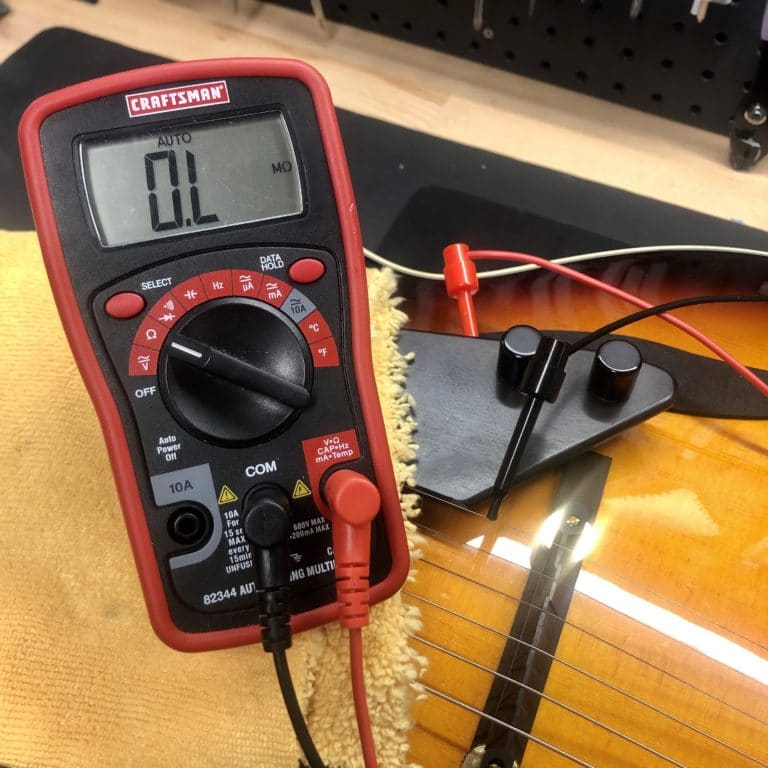
In electronics, “continuity” means that there is a link between two given points; they are electronically connected to one another. To test for continuity, we use a multimeter with one lead clipped to a guitar string and the other lead grounded. In the photo, the meter shows “open lead”, indicating that there is no continuity; the string is not connected to ground. This means there is no string ground wire!
After talking with the client, and confirming that he often found the instrument to be noisy, we got approval to modify the electronics for quieter operation.

Since most metals conduct electricity, instruments with a metal bridge or tailpiece (like the examples shown above) can be grounded by simply attaching a length of wire from either component to the electronic ground. As previously explained, this will create continuity to the metal strings which are in contact with it.
Since wood does not conduct electricity, it is a bit more complicated to wire a string ground on this instrument on account of the floating bridge’s wooden base and the tailpiece’s largely wooden body.
Fortunately, we were able to modify the tailpiece by attaching a wire underneath the brass string plate on the top side, then running it underneath to the metal mounting bracket that holds the endpin. We used some copper tape to hold it in position. We then run a wire from the tailpiece to ground as normal. True to the manufacturer’s aesthetic, once installed, the wire is out sight and free from the top.
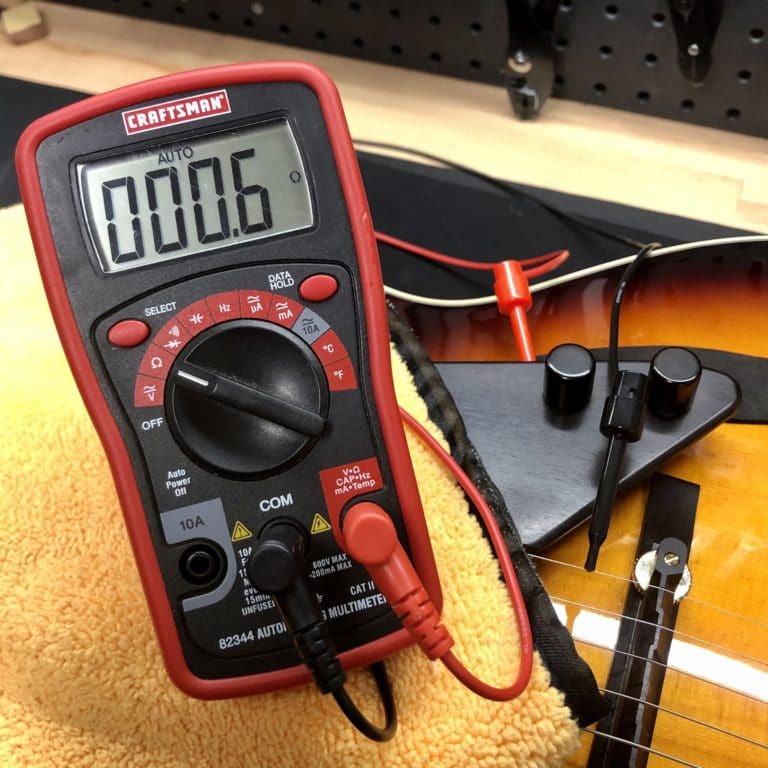
After connecting the mounting bracket of the modified tailpiece to ground, the multimeter now shows a reading, indicating that there is continuity. The string ground is functioning properly.
Having retrofitted this important piece, the guitar should be much quieter during use. Touching the strings will now ground the player and cut down on unwanted noise.
Having also completed a fret level, crown, and polish and setup on the instrument, this guitar is ready to play some Jazz!
My Guitar Has A String Ground, But It Still Buzzes!
A string ground wire is just one tool in the kit of reducing unwanted noise in your guitar’s signal path. In extremely EMI intensive environments, shielding the instrument’s control cavities can provide additional noise relief.
Neither a string ground, nor shielding, will eliminate the 60-cycle hum that is inherent to single coil pickup designs; For that you might consider replacing your guitar’s pickups. Nor will it eliminate noise from sources further down the signal chain such as bad cabling, effect pedals, pedalboard power supplies, amplifiers, etc. In these cases, further troubleshooting may be necessary to isolate the cause of the noise!

Erik Salomon - Calico Guitarworks Owner / Head Technician
Tech Talk articles are part of an ongoing effort to provide clear and detailed answers to common questions about guitar maintenance, modifications, and repairs.
While not intended as a step-by-step guide to servicing your own instrument, we hope that you will find value in the information provided.

Great Repairs Start With The Right Parts
Many of the parts mentioned in our blogs are available for purchase at:
GuitarRepairParts.com
Enter the code "TechTalk10" at checkout for 10% off your first order.
About Calico Guitarworks
Calico Guitarworks is the area’s premier destination for fretted musical instrument care and maintenance. Owned and managed by Erik Salomon, the shop is dedicated to providing quick, honest and reliable service. The staff at Calico Guitarworks has a combined 25+ years of professional guitar repair experience. Sharing the knowledge that we accumulate in this focused pursuit is at the core of what we do. Learn more About Calico Guitarworks, explore our Frequently Asked Questions, or Contact us with a specific request.

